Favorite Container #8: Desktop File

This month, August, I’m back to thinking about papers as the start of school approaches. I’ve been filling out school-related forms, signing my daughter up for after-school activities, and receiving lots of information from her new teams and groups.

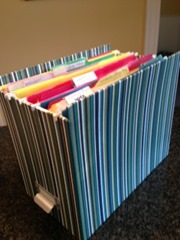
My all-time favorite container for organizing papers and projects is a desktop file box. Here are the details:

What:  A box that is designed to hold hanging folders and files, and can sit on your desk or kitchen counter.

When to use it: Use this kind of box for your key files – files that you need to see all the time, and for current projects. My desktop file box always has these folders in it:

  • Camp Ideas (for my daughter)
  • Activities (for my daughter – things she may want to try)
  • To Buy
  • Family Meeting (any papers that my husband and I need to discuss)
  • Current Projects – Home (colors for a bedroom, estimates from the painter) Current Projects – Work

How to use it: Create hanging file folders for the key papers you tend to hold on to – not for every one, but what are the general categories of papers that end up on your counter or desk? Once you have the categories set, you can use individual manila file folders to separate papers inside the hanging folder if needed. Note: The categories may change over time as you see what kinds of papers you have, so don’t be afraid to change the folders.  No system is perfect at the beginning – you need to live with it and use it for a while to see what works.

Why to use it: A desktop file box helps move your papers from piles to vertical files, making them much easier to see! When you can see your papers, you can actually take them out and use them…and have a place to put them away.

Where to purchase: Basic desktop file boxes can be found at Staples and Office Max. Look on Amazon.com and The Container Store for file boxes in fun designs and natural materials.

See how a client set up her own Desktop File box in this blog post. For an idea on how to organize your financial papers, check out this recent Favorite Container post.

The Party Closet

This week I helped a client clear a lot of post-vacation and post-party clutter that was in her living room, dining room and kitchen. One of the most fun projects (yes, I think organizing is fun!!!) was tidying up her Party Closet. 

This client is fortunate to have two large closets by her front door. One is used for coats, and the other stores party items—what I now call the Party Closet. 

The client told me she created this party storage area 15 years ago and it really works. It’s a brilliant idea if you have the space.

What makes this work?

  • It’s a great location. It is right outside the dining room and kitchen, where these items are used.
  • While some families may need the second closet for coats, this client has several kids and hosts all kinds of parties, at her home and at other venues. It’s a good use of space for her.
  • She uses every inch of space in the closet: her tablecloths are stored on hangers hung from the clothing bar. The party serving wear is stored on the top shelf. On the bottom are clear labeled bins filled with party napkins, paper plates, serving wear, and utensils.
  • Everything can be easily seen, removed and put away.

I was so inspired by her idea I had to share it!

Organizing from a Child’s Perspective

This week I helped a mom of two – with twins on the way – get through a few organizing projects. One of the goals was to organize items in a way that her children could access them on their own, because this mom is going to be busy when her new babies arrive!

One of the projects we tackled in the kitchen was to sort and organize the kids plastic plates, bowls, cups and utensils. They had been stashed in a few spots in the kitchen, so we gathered them up, sorted through to keep the best, and then relocated everything to a new home. We were able to claim a whole drawer that was now the designated “kids drawer.” Everything they’d need for meals was in there, and they could easily reach it. This client reported that her kids loved that they had their own space in the kitchen.

The other project was to get a closet filled with games, craft supplies and other items in better order. It was pretty well sorted and organized, but we brainstormed how to make it work even better. With the addition of the clear plastic drawers, the arts and crafts items now each had a storage spot – all labeled.  Many of the supplies had been stored in stacked plastic bins which is OK, but the drawers brought the items down to where the kids could easily see and access what they’d need.

Just a few changes should have a big impact on this family.

Favorite Container #1: Kitchen Drawer with Flatware Organizer

My first favorite container is: this drawer in my kitchen. Yes, a drawer! Drawers are often under-utilized containers in our homes. This organized drawer is one of the things I really and truly enjoy about the new kitchen.

I love that this drawer glides effortlessly open and close – unlike our old kitchen which had only two heavy old drawers that would fall out on your foot if you pulled them open too far.

I also love that this drawer is large enough and allows me to see everything at once.  The flatware organizer is a good size, plus it expands on either side so it can fit various drawer sizes. It’s similar to this one from The Container Store.

On the left side of the drawer I added another white container that I had from my old kitchen. It holds the less-used tools, and keeps them from becoming a jumble when the drawer is opened.

If you are re-doing your kitchen, I strongly recommend that you incorporate drawers for storage. From flatware, to food storage containers, to pantry staples and cooking pots, drawers are a great container for the kitchen.

If you have old drawers that don’t work well, get them fixed! We learn to live with a lot but fixing a few of these nagging problems around the home can give you a whole new outlook on your space. And don’t overstuff the drawers with things you don’t use.

For more kitchen storage tips, purchase my 12 Months of Organizing: Kitchen Storage Solutions 2013 Desk Calendar today!

Kitchen Storage Solutions: The 2013 Calendar is Available!

Happy New Year! Need inspiration to organize your kitchen?

Order my 12 Months of Organizing2013 Kitchen Storage Solutions Desk Calendar today.

This year’s calendar is filled with creative solutions for the most important room in your home: the kitchen! Co-created with my cousin, we share 12 of our favorite ideas to help you make your kitchen an efficient space. When your kitchen is simplified and organized, it’s easy to keep it looking good while working hard.

Hurry, supplies are limited. Order yours today!

Organizing Your Household, circa 1910

While my husband was in bed with a cold and my daughter fast asleep, I spent the evenings of a recent weekend watching Downton Abbey late into the night. Yes, I know I’m late to the game. I started watching season 1 of the series and was hooked immediately.

What does Downton Abbey have to do with organizing? In such a vast estate as Lord Grantham’s (OK, he lives in a castle), there has to be a large ensemble of household staff to keep everything in order.

How does the staff remember what they need to buy to keep the household running smoothly? In an episode near the end of season one, I saw a vintage organizing tool. In one of the scenes in the kitchen I noticed something intriguing hanging on the wall behind the cook. It passed out of sight quickly but I re-wound and paused it. It was what I thought I had glimpsed: a Household Wants Indicator.

The Household Wants Indicator is a metal board with a pre-written list of items in alphabetical order: from almonds and ammonia, to vinegar and wines. There are metal flags next to each item that you’d flip over as a reminder to purchase the item. The tag is red on the flipped side so it stands out in the list. It’s the original automated checklist!

And while searching online for photos of a Household Wants Indicator, of course I happened upon this app for the iPad.  I might just have to toss my pre-printed paper grocery list for this cool one.

A+ Homework Helpers

Try these tips to set up an effective homework spot for your child:

  • Clear the desk clutter. Does your child have a clear space to spread out and work? Remove anything that has piled up on the desk but isn't related to homework.
  • Have the most-used supplies (pens, pencils, stapler, notepad) out on the desk and ready to go.
  • Make sure your child's desk has drawers or another spot to keep the less-used school/craft supplies.
  • If your child prefers to work at the kitchen, stash supplies in a cabinet or basket.
  • Have good lighting for the workspace.
  • If your child likes to work on the bed, get a lap desk.
  • Provide a place for the papers. No matter where your child likes to work - desk, bed, or kitchen counter - be sure they have a place to store their school papers. A desktop file works great - label a folder for each class.

This article originally appeared in The Neat Sheet September/October 2012

Product Review: My Favorite Clear Containers

I’m often asked, “so where do you get your containers? Is there a secret store that only Professional Organizers know about?” No, we don’t have an inside deal on containers, and I buy them at the same places you do…Bed Bath & Beyond, Target, and The Container Store.

But when it comes to clear shoe boxes and sweater boxes, I recommend the ones from The Container Store. Why you ask?

1. Clarity: Using a clear container for many things is a given. But The Container Store boxes are much clearer than other brands…and clearer than ones I had from years ago. I noticed this recently as I replaced my older large storage boxes with The Container Store sweater boxes. Using smaller boxes on my high closet shelf now makes it easier for me to bring down just the bin of sweaters I need…instead of pulling down the huge under-the-bed box I had been using.

2. Stackable: The Container Store clear boxes stack easily and kind of snap into place.

3. Sturdy: I like how the box lids snap on tightly, and the plastic is strong and durable.

4. Versatile: While The Container Store boxes are perfect for sweaters, boots and shoes as their names imply…I have also used them at clients homes to organize:

  • office supplies
  • craft supplies
  • kids artwork
  • pantry items
  • basement shelves
  • even food in the freezer!

Of course I received no compensation for this post…I just have come to love this product.

Organizing in the Kitchen: What are your online tools?

Say the phrase “kitchen tools” and you probably think of a stand mixer, chef knife, or set of measuring cups.  But what online tools have you tried?

MP900175492[1]_thumb.jpg

As a busy parent, I know that finding the time to plan meals, shop, and cook can be a challenge. Here are a few online tools I've tried to save time:

  • Online grocery delivery: When I lived in an apartment and couldn’t carry bags of groceries home I regularly ordered my groceries online. Now I use the deliveries when my schedule is too hectic. A busy mom friend says this service saves her every week, especially with store app for smartphones. Her basic shopping list is always ready to go.
  • Recipes online: I use websites to find the perfect birthday cake for my party theme, or to discover a new way to cook Brussels sprouts. My sister also uses Pinterest to “pin” her favorite recipes from the web, allowing her not only to have the recipe but also a photo of the dish.
  • Cooking magazines online: In my home we love Cook’s Illustrated and subscribe online so that we can find any recipe we need, any time. Now we don’t have to search through all the magazines to find that dessert we wanted to try. My husband loves their app for the iPad too.

I have been telling parents about The 6 o’clock Scramble website. Subscribe and you’ll receive weekly meal plans with shopping lists and healthy eating tips! I haven’t tried it yet but it looks like it could be a huge help.

What online tools have you tried to make it easier to get meals on the table?

Taking Stock of Organizing Systems

Our kitchen renovation project is half way done, and I can finally see some light at the end of the tunnel. The plumbing and electrical systems are updated, new walls and trim are up, and the cabinets areinstalled. I’m already dreaming about where I’ll put the cookware and the dishes.

At this half-way point I decided to take stock of the project and how I thought living in a house without a kitchen would play out. Some of the organizing systems we set up were working…and some were not.

What works: school papers. The portable basket for my daughter’s school papers and family information binder easily moved into the dining room and keeps us on track. I go through the paper piles on the corner of the dining room table every day and sort, purge or file.

What hasn’t been working: shoes. Our shoes used to get kicked off and land in the hall closet, which is now being converted into a half bathroom. Without the use of the closet, the shoes have morphed into a mountain by the front door. At first we tried leaving just the pairs we were wearing by the door but that quickly fell apart.

The fix? My husband remembered that we had a shoe/boot shelf in the basement. He brought up the rack, tucked it behind the front door, and voila – instant organization. We each get a shelf: shoes that fit on the shelf can stay, otherwise they need to be put away. It’s not beautiful but highly functional as a temporary solution. (We’ll have a mudroom area once the new kitchen is done.)

My takeaways: 1) simple solutions, like the portable basket, work—and can be flexible in different spaces; 2) losing a closet is a major change and calls for creative thinking for a new system.

Don’t give up if your first organizing attempt doesn’t work as planned. Try, try again!

Rein in The Recipes

If you have one of our 12 Months of Organizing calendars, you know that this month the tip is for recipe organization. Given that my kitchen is under construction and my house is in a state of chaos, I decided to gain control over one small area that had been bothering me: my recipes.

Favorite recipes used to be easily contained in the small accordion file my mom gave me for my wedding engagement, but the file was bursting at the seams. I also started to wedge recipes I had printed or pulled from magazines between the cookbooks on my shelf. It was turning into a jumble of papers. And then I had an old-fashioned recipe card file that was stuffed too.

I emptied the accordion file and the recipe card box, and pulled out all the loose recipes. Now what to do? Sort! I spread the recipes all over the floor and started to group them into categories.

Next, I purged recipes that I had in duplicate or that I knew I’d never make. I also found a ton of delicious recipes I had completely forgotten about.

Now for the fun part: I put all the recipes to keep in a binder! Actually, two binders. I had this solution in mind and was ready with tabs and hundreds of plastic sleeves. The plastic sleeves work for small recipe cards and full size printed pages.

The result? Recipes are sorted by categories, and all easily visible in the sleeves. I can also pull out the sleeves for cooking and the recipes won’t get dirty or damp.

Can’t wait to cook again!

Knickknack Paddywack, Will The Stuff Come Back?

When I was getting ready for my kitchen renovation I first started to pack up the decorative items from the kitchen. As I took down everything I had displayed on the top pantry shelf and window sill, I realized how knickknacks have a way of multiplying.

I love the display of glass bottles on the window, but maybe the silver tea bag holder doesn’t need to be there. And it might be time for my beloved ornament from Ratatouille to find its way to the Christmas tree instead of the kitchen.

I looked at the window sill minus the jars, ornament and other things and thought hmm…this is nice.

I was reminded of another time when I put away knickknacks: when my daughter was a toddler. This coincided with the sale of our first house which worked out well; it was much easier to stage and show the condo without too many knickknacks around.

Once we moved to our current home many of the knickknacks stayed away, as I’ve blogged about before. The same thing might happen in the new kitchen. Bottles in, Ratatouille ornament out.

Can you live with more empty space? Is it time for you to take a fresh look at your space and see if you can lighten up? Sometimes taking away (and donating!) a few knickknacks in your room can make a huge difference.

How to Stay Sane? Tip 2: Get Rid of the Stuff

In my last post about how to stay sane during a kitchen renovation, I shared Tip 1: make a list (or two). 

Tip 2: get rid of as much excess stuff as possible.

In going through my kitchen to pack it all up, I inevitably found a few more things that we could let go; how many cheese graters and coffee grinders does a family need? As I’ve written before, home improvement projects create the perfect time to pause and purge.

And because I needed to store the kitchen items in the attic and the basement during the renovation, I was forced to confront those spaces as well.

The books and clothes from the attic that I had planned to give away months ago – donated.  The box of dishes and vases for the consignment store – taken.  The outdated cell phones and electronics from the basement – gone!  Some items have been sold, but most have been donated.

How do we get the stuff out? I used Craigslist to sell the exercise equipment we never used, a local parents email list to get rid of finger paints and chalk, and Freecycledother random items from a full roll of shelf liner to an HP printer/fax/scanner/copier that only functions as a printer. And I’ve donated books to More Than Words and clothing and small housewares to Goodwill.

After getting the excess out I felt much better and lighter. I guess that is the upside of a major renovation project. Stay tuned for more kitchen related tips.

One Thing Leads to Another

The time has come…we are having our kitchen remodeled!

Well, remodeled isn’t actually the best word since we don’t have much to remodel. I think of it as starting from scratch since we’ll be adding cabinets and counters, and modern conveniences like a dishwasher and disposal.

Since we won’t have use of the kitchen for many weeks, we will set up a temporary kitchen in our dining room with the fridge, microware, and crockpot. Of course, this meant that we’ve had to move things around in the dining room to make it function as a kitchen. We now have metal shelves set up, ready to hold our pantry supplies and some basic dishes. My daughter’s art table has been relocated upstairs, and the sideboard goes into the attic.

Ah, the attic. So to make room in the attic for the sideboard and all the boxes of kitchen things we won’t use during the remodel, we had to put away all those things that hadn’t found their way back to where they belong. Even though I go through things in the attic once or twice a year, they seem to multiply after I shut the door. So my other tactic has been to purge, purge, purge along the way.

And just so no floor in our house goes untouched, the kitchen project of course affects the basement, where the contractors will need to store things and come in and out. My husband has been amazing in this area, leaving no corner untouched. Screens that don’t match any of our windows – gone! Broken wood from our porch repair – gone!

I know firsthand that moving stuff from one room to another inevitably means something else gets moved or turned upside down.

If you are facing a big organization project (home remodel, turning an office into a baby’s room) don’t get discouraged. Make a plan and a list. Keep it in perspective. Work on one area at a time.  Get rid of as much stuff you don’t use as you can. And if you need help, call a friend for a few hours, or contact That’s Neat! Organizing.

Look for more tips on how I keep my sanity during the renovation project.

Dropped, Plopped and Stopped!

Great tips to organize those important drop-zones by guest blogger, Janna Lufkin. 

Let’s face it, we all have those unsightly areas in our homes that seem to catch everything as soon as we hit the door. The kids drop books, backpacks and lunch pails. We adults plop down our briefcases and/or purses, our shoes - even our mail. These spots grab it all and often not in a very orderly manner. You might have a mudroom for this purpose but a good number of us carve a “drop zone” out of hallways, overstuffed closets, stairways, laundry rooms and sometimes even valuable kitchen countertop space.

This summer (before the new school year starts) why not create an organized, efficient area for all of these daily essentials?

Here are a few ideas:

  • Mudrooms. If you’re fortunate enough to have such a designated space, make it work for more than just your shoes, boots and coats. Add hooks for each family member and encourage them to hang backpacks, purses and briefcases. If your mudroom has a bench, slide labeled bins underneath for each family member to hold books, sports equipment even pet supplies. Hang a simple file organizer for mail and add a key hook underneath so you won’t spend valuable morning time searching for your keys.
  • Hallways. If a central hall area space works best for your family, add a bench and use the space underneath for storage. Labeled bins or baskets work well. Add a coat rack or install hooks. A simple tall container (clear glass cylinder, vase or galvanized flower bucket) makes a great umbrella stand. A basket to catch the mail, and another for pet supplies (leashes, collars, toys, towel).
  • Hall Closet. Install efficient, adjustable shelving and a hanging coat rod. My favorite system is by Elfa. It adjusts by the inch! Measure typical items that would go into the closet (how long are your coats for example?) and adjust accordingly. Sort and stack hats, gloves, scarves, shoes and other daily essentials and purchase bins for each family members stuff. Slide a basket or two onto the floor and use for backpacks and sports equipment. Don’t forget to use the inside of the closet door for storage too. Small hanging shoe bags work great for keys, glasses, sunscreen, etc. and a file holder for the daily mail.
  • Kitchen Area. If you must use valuable kitchen space for these items, try to designate a cupboard close to the door. Purchase bins for books and backpacks; label them and place on the cabinet shelves. On the countertop above, place a letter basket for mail and a free-standing accordion file labeled with each family member’s name for important papers (homework, bills to be paid, etc.) If space allows, add a bulletin board for notes and a calendar. A cute flower pot holds keys and another for pens, pencils and stamps.

So stop the morning chaos. Spend a little time this summer carving out an efficient drop-zone in your home. Before you know it, you’ll be spending valuable time enjoying an extra few minutes of shut-eye or another cup of Joe.

-Janna

Spices of Life

My super-organized cousin is back again to share how she organizes her spices. 

A few weeks ago a neighbor asked me how to go about organizing the spices in her kitchen. She, like many of us, had collected a variety of spices beyond the usual parsley, sage, rosemary and thyme and the storage and organization of these various bottles, jars and cans has become an issue.

Years ago I had the same issues in my kitchen so I came up with this system to eliminate the problem. Here’s what works for me:

  • Buy spices in bulk if available. This eliminates packaging waste and you can purchase just the amount you need.
  • Buy one style of container and decant all of your dried spices into them. Buy a few extras so you’ll have them on hand when you need to add a new spice to your collection. I like clear glass bottles with screw on lids – these are a great choice. 
  • Label all of your spice jars either on the top if you choose to store them standing up in a drawer, or on the side if they are stored in a pantry or cupboard.
  • Organize spices alphabetically.
  • Put a removable or reusable wipe-off sticker on the bottom of each spice jar with the expiration date of each spice. Most spice companies will date their spices for freshness.
  • If you’ve purchased a bit more spice than will fit in your jars, store it in small zip top bags, label with the variety of spice and expiration date and store in the freezer.

I keep the spices I use everyday - oregano, rosemary, sage and thyme - on my kitchen counter in a tray by my stove. I also keep a variety of salts and peppers on another tray along with bulbs of garlic, olive oils and vinegars, and I have two pots of fresh herbs on my kitchen windowsill.

Hopefully these tips will be helpful to you in your own kitchen. Remember to select a container and labeling system that work for you and stick with it. Soon, you’ll find it’s fast and easy to have a pinch of fresh herbs and spices at your fingertips.

-Janna

A Recipe for Success: Two 30-minute Kitchen Makeovers

These tips were originally published in The Neat Sheet newsletter (Nov/Dec 2008) from That’s Neat! Organizing.

1. The Fridge: November is national "Clean out your Fridge" month. This is nobody's favorite task, but it is important for several reasons: getting rid of expired foods can keep your family safe and healthy; knowing what is in your fridge can keep you from purchasing duplicate items and save money; and cleaning out your fridge and freezer will free up space for holiday cooking.

Get started following these easy steps:

  • Gather supplies: gloves, sponge, cleaner, masking tape and marker for labeling items, and garbage bags
  • Take everything off the shelves and out of the drawers in your fridge. Wipe clean each shelf and drawer.
  • Pick up everything that you took out of the fridge; throw out any unidentifiable leftovers and expired foods.
  • Group the remaining items into similar categories such as drinks, dairy, veggies, and leftovers.
  • Put the items back in your fridge, keeping the groups together. Many fridges are designed to help with this by having drawers for meat, fruits, or veggies.
  • Follow the same process with your fridge shelves, keeping things together like peanut butter and jelly or marinades and sauces. Adjust the fridge shelves if necessary. Also, use plastic bins or a lazy susan to keep small items from getting lost in the back of the fridge.   
  • Now tackle the freezer using the same process. Take everything out, even food in the way back, and throw out anything that has been around for a year, or has a layer of permafrost. If you have food in containers, label each one before you put it back. Get into the habit of writing a description and the date on everything before it goes in the freezer. For two nights in the coming week, plan a meal using up foods in your freezer and fridge.

2. The Pantry: A well-stocked pantry is a must for cooking, but a well-organized pantry means you can actually find what you need quickly and easily (and help avoid those last-minute trips to the grocery store). Whether your pantry is a whole room or a few cabinets, try this quick fix.  

  • Gather your supplies: sponge and cleaner, small plastic bins, garbage bags, paper and pen.
  • Take everything out of your pantry and clean each shelf.
  • Sort the items into categories such as baking, spices, canned vegetables, pasta, and cereal.
  • For each category get rid of expired foods, items that are stale, and any empty containers. As you purge, make a shopping list of things you'll need to replace. 
  • Put items back, keeping categories together. Place foods that you use often, such as cereal and snacks, within easy access. Place foods that you use less often (or don't want the kids to reach) on higher shelves.
  • Use containers to keep small items together. Products such as Expand-a-Shelf can also help you find items in the back.
  • Consider labeling sections of the pantry to make it easier to find and put away items. You may have a section for snacks, pasta, or cereals.

Enjoy your re-organized kitchen!

Who Knew? Time to Organize your Fridge & Freezer

Great tips for organizing your fridge and freezer from guest blogger, Janna Lufkin.

Whoopie! Did you know that November is National Clean out Your Fridge Month? Me either… until Elizabeth informed me that I was ahead of the game (I cleaned mine last month)! Seriously? A whole month dedicated to the discovery of the icky, the sticky, the gooey and the furry? Yep.

Stuffing the turkey takes on a whole new meaning when you’re trying to make room for it in your over-stuffed fridge, so November is the perfect time to tackle this task.

I not only cleaned out my fridge, I went ahead and did the freezer too. Might as well, right? And I did something I’ve been meaning to do for years, create a Freezer Inventory Log so I know what I have and when I bought it. Now, I go to my “log” before I make my weekly grocery list. Brilliant!

My freezer log started out as nothing fancy. A small, re-purposed three-ring binder. I added a couple of dividers (I have an old fridge/freezer in my garage too), then divided the binder into Inside and Outside categories.

Next, I made a list of the items in each freezer and divided it up alphabetically and by the types of foods and added the date it was purchased. Note: Keep a marker by your fridge/freezer and write the date purchased on the item.

The Freezer Inventory Log is as simple as this:

INSIDE
Date: October 2009

Baking:
1 pkg. Pie Crust (9/09)
1 pkg. Puff Pastry (7/09)

Bread/Crackers:
1 Baguette (10/09)
2 Wheat Sandwich Bread (10/09)

Fruit:
1 pkg. (1lb) strawberries (8/09)

Beef:
1 pkg. Flank Steak (7/09)
2 Skirt Steaks (7/09)

Pork:
1 Tenderloin (9/09)

and so on….

Oh, and another discovery…once I did my binder I quickly realized I could just keep the list on my computer desktop (remember I’m older than Elizabeth, I did not grow up with technology). It’s easily updated and right there for quick reference.

Honestly, for someone who is perceived as being “so organized”, this one task had slipped by me for years. I can’t tell you how much food we’ve managed to eat up in the past month. Diver scallops – yum!

-Janna